Results 1 to 18 of 90

Thread: OMG, another 6MT conversion thread.

Hybrid View

  1. #1
    Registered User
    Join Date
    Jan 2014
    Location
    Kansas City, MO
    Posts
    381
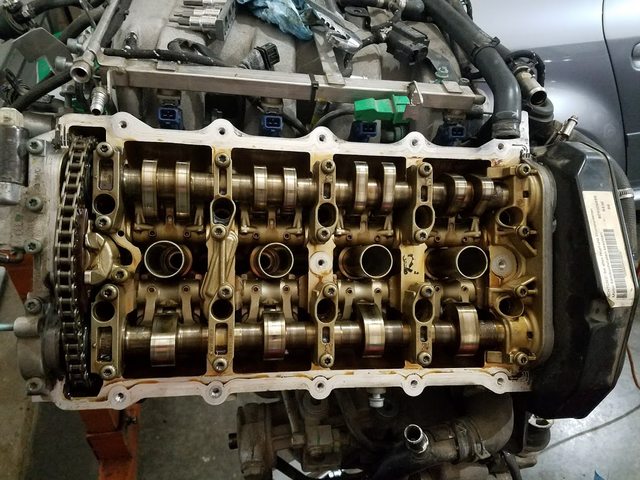
    I'm not saying your motor hasn't been apart recently but I had the same sharpie L & R on the two BCYs I have in my possession. Change the tensioner pads! You truly don't know the history, especially with the shoddy work/mismatch hardware. Added peace of mind you won't have to tear it apart again so soon. Just ask Jolio.

    Use a bit of RTV on the cam seals.


    BCY #1 ~101k miles


    BCY #2 ~59k miles

    Attached Thumbnails Attached Thumbnails Click image for larger version. 

Name:	IPfeueeh.jpg 
Views:	751 
Size:	75.3 KB 
ID:	19031   Click image for larger version. 

Name:	W89GZfsh.jpg 
Views:	736 
Size:	68.2 KB 
ID:	19032   Click image for larger version. 

Name:	fylGx79l.jpg 
Views:	785 
Size:	78.4 KB 
ID:	19033   Click image for larger version. 

Name:	wxjGlipl.jpg 
Views:	764 
Size:	83.3 KB 
ID:	19034  
    03 RS6 Avus/Ebony #905593 resurrected 6MT, 04 Avalanche Z71, 87 T-Bird Turbo Coupe (351W T5), 04 Aprilia RSVR Factory

  2. #2
    Registered User redwoodkiwi's Avatar
    Join Date
    Nov 2019
    Location
    Bay Area, CA
    Posts
    41
    Quote Originally Posted by bethridg View Post
    I'm not saying your motor hasn't been apart recently but I had the same sharpie L & R on the two BCYs I have in my possession. Change the tensioner pads! You truly don't know the history, especially with the shoddy work/mismatch hardware. Added peace of mind you won't have to tear it apart again so soon. Just ask Jolio.
    Oh, now that's interesting. Maybe that is factory procedure to label them that way. Actually, now that I think about it - it's not that surprising, given that these limited edition motors were all assembled by Cosworth, by hand, in the UK. Sloppy Brits (kidding).

    I'm still of the firm belief that the heads on mine have been apart and reco'd (or replaced). The varnishing is not consistent between the valve covers and the head hardware. My heads look closest to your 59k miles version (yet mine have 106k miles on them). Still, point taken about not knowing the history - I'll change the tensioner pads. Thank's for the nudge @bethridg.
    Audi RS4 B7, Audi RS6 C5, Audi Allroad 2.7T C5, Audi S4 Cab 4.2L 6MT B6, Audi A6 6MT 2.7T C5, '77 Mercedes 450SEL

  3. #3
    Registered User redwoodkiwi's Avatar
    Join Date
    Nov 2019
    Location
    Bay Area, CA
    Posts
    41
    Well, crap. Note to all messing with chain tensioners - don't compress the pistons too much, or it could get stuck - real stuck.

    Removed the chain tensioners to replace the pads. One done fine - but the other, not so much. As I was pressing hard to get the pad on, the piston went so far down into the chamber that it got stuck. No worries, just pull it out. Except it wont come it - nothing get's it out. In my attempt to retract, I broke one of the guide posts (cast aluminium - it didn't take much to break it). Sucks! Anyone been here before? Or am I the only chump?


    So, a replacement is ordered (a used one from Wolf Auto - I don't feel good about trusting one of the the cheap AMZN/eBay ones - thoughts?), but I can't proceed under the valve covers until it arrives.
    Attached Thumbnails Attached Thumbnails Click image for larger version. 

Name:	IMG_9742_sm.jpg 
Views:	706 
Size:	127.2 KB 
ID:	19037  
    Audi RS4 B7, Audi RS6 C5, Audi Allroad 2.7T C5, Audi S4 Cab 4.2L 6MT B6, Audi A6 6MT 2.7T C5, '77 Mercedes 450SEL

  4. #4
    Registered User redwoodkiwi's Avatar
    Join Date
    Nov 2019
    Location
    Bay Area, CA
    Posts
    41
    In the meantime, these arrived (starter blanket, and the newer longer manifold fasteners for the recesses) - so I can get back to the part of the procedure.

    Attached Thumbnails Attached Thumbnails Click image for larger version. 

Name:	IMG_9734_sm.jpg 
Views:	688 
Size:	146.8 KB 
ID:	19038  
    Audi RS4 B7, Audi RS6 C5, Audi Allroad 2.7T C5, Audi S4 Cab 4.2L 6MT B6, Audi A6 6MT 2.7T C5, '77 Mercedes 450SEL

  5. #5
    Registered User redwoodkiwi's Avatar
    Join Date
    Nov 2019
    Location
    Bay Area, CA
    Posts
    41
    Paging @SteveKen

    I'm testing the mesh of the starter, but doing so by pulling out the pinion manually. I don't want to test crank and turn it over as I've got the crankshaft locked and the cams are out while I wait for the replacement tensioner - but I do want to button all this up and get the gearbox on. Can you eyeball this and give your blessing:


    The pinion teeth find their place at about half way in. As best as I can tell (by examining the scouring on the stock ring-gear, that's about where things were with the stock-starter/auto).


    Attached Thumbnails Attached Thumbnails Click image for larger version. 

Name:	IMG_9745_sm.jpg 
Views:	707 
Size:	57.1 KB 
ID:	19039   Click image for larger version. 

Name:	IMG_9746_sm.jpg 
Views:	719 
Size:	60.6 KB 
ID:	19040  
    Audi RS4 B7, Audi RS6 C5, Audi Allroad 2.7T C5, Audi S4 Cab 4.2L 6MT B6, Audi A6 6MT 2.7T C5, '77 Mercedes 450SEL

  6. #6
    Registered User
    Join Date
    Dec 2007
    Location
    Pittsburgh, PA area
    Posts
    1,263
    I think what you have in the picture looks good.

    I've never had any issue with starter engagement, even though there is some wiggle room. Axially it's fixed and the guide says it shouldn't protrude past the back of the ring gear on the flywheel. half to 2/3rds into the flywheel is optimal, so this is built into the adapter.

    Radially, there is some wiggle room.

    How do you currently have it attached now without the transmission in place? I keep a bolt that matches the thread in lower starter hole of the block (M14 x 1 I think) to get the bottom completely centered and try to eyeball the top based on where I think it's centered as it pivots on the lower hole. Then with that lower bolt tightened, I actually run the starter using a makeshift harness to crank over the engine to check engagement. I've never had to adjust one, though with everything just visually centered. If you just have it attached with an M12 and a nut then you can't install the adapter & transmission unless you remove it and you have to readjust it again.

    The starter can stay locked into position for mating the transmission if the temporary bolt on the lower is flush or protrudes a mm or so. Then when the trans and adapter are in place you can remove the lower bolt after the top is tightened and then use the lower 120mm bolt and nut to sandwich everything together.
    2012 Q7 TDI S-Line - 2010 GTI - 2007 A3 3.2 S-Line - 2003 RS6
    2001 Honda S2000 - 1977 Honda CBR 750-F2 - 1965 GMC 1500 WideSide

  7. #7
    Registered User redwoodkiwi's Avatar
    Join Date
    Nov 2019
    Location
    Bay Area, CA
    Posts
    41
    Ok, good.

    Quote Originally Posted by SteveKen View Post
    How do you currently have it attached now without the transmission in place? I keep a bolt that matches the thread in lower starter hole of the block (M14 x 1 I think) to get the bottom completely centered and try to eyeball the top based on where I think it's centered as it pivots on the lower hole.
    I'm doing exactly that. For the bottom bolt, I'm using a long wheel-lug bolt with a cone shoulder - which ensures a centered fit and does not protrude. For the top, I eyeballed-it as as I could with an eye-line through the ring-gear to the pinion teeth - and that got me the result you see above.

    Quote Originally Posted by SteveKen View Post
    Then with that lower bolt tightened, I actually run the starter using a makeshift harness to crank over the engine to check engagement.
    I can't do that with my cams out. So, I'm just going to go with how things are based on nothing looking our of order.

    Thanks Steve.
    Audi RS4 B7, Audi RS6 C5, Audi Allroad 2.7T C5, Audi S4 Cab 4.2L 6MT B6, Audi A6 6MT 2.7T C5, '77 Mercedes 450SEL

Posting Permissions

  • You may not post new threads
  • You may not post replies
  • You may not post attachments
  • You may not edit your posts
  •