You only use the two screws....it is such a tight fit....
Stephen


You only use the two screws....it is such a tight fit....
Stephen

Agree, very snug. I drove around for a day without the two screws. It is that snug. My original plan was to take it back off for the winter, so I didn't want to mess with the screws. I was going to take some pictures and put it away. When I tried to take it back off, I began pulling but then was overcome with fear that it was going to crack more and just decided to leave it on for the winter i.e., snowplow. I want to get a clear bra on it. If I plow a little snow so be it.
Of note, the edges of the carbon fiber lip are sharp. Luckily I have a clear bra on my front bumper. I fear this lip would eat up the paint without one. I don't know a way to protect your bumper as you put it on. You do not need double sided tape. It would be nice to get something soft in between the bumper and the lip, but I don't believe you have enough room.
Stephen says this is a two man job. I did it without help which might be why I had a challenge.
Anyway, I look forward to everyone's pictures! Whether you put it on now or in the spring be sure to post a few!
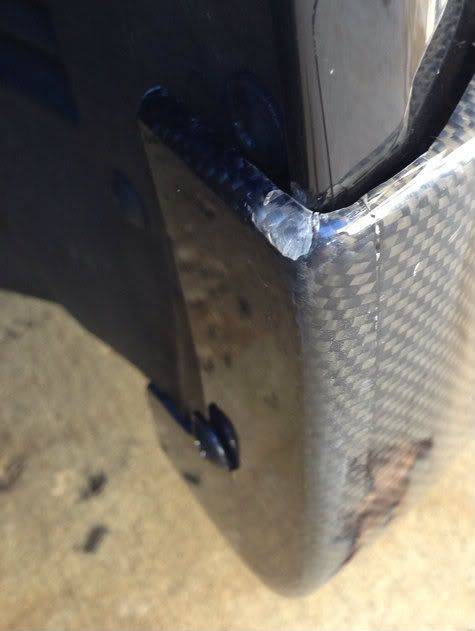
Below is a picture of where mine cracked as I was pulling to get it on. It is unnoticeable from 5 feet, but here is a close-up. I bought some epoxy to arrest the crack.
03 RS6 Ebony Pearl Effect on Ebony / Carbon Fiber / MTM TCU / Sportec Cooling / KWV3 Coilovers / Hotchkis Sway Bars / Stern Control Arms / HRE P40SC Wheels / Hawk HPS pads / RNS-E / + pedals / Rear Window Spoiler / Cleared Corners
Thanks for the details 1uglymug & Stephencl - very helpful! I will clear the bumper before the install to protect the paint.
Final dumb question: the two screws are the existing hex bolts in the bumper now correct?
-MG
______________
'03 PY BMW ///M3
'03 DB RS6

Correct. Lower screws in the wheel wells. 1uglymug's image above shows it perfectly.Originally Posted by Mudguts

Remove both screws, mount it (as Stephen says from the center out to get slack), pop one side on, then the other.
I found it helpful to use a finishing nail as a sounding device to center the hole perfectly before starting the screw. I also did it by myself using rags to support the ends and keep them from getting scratched by the ground, but a second set of hands would have been a help.
Personally, I used double-sided tape on the inside of the lip at several key points so that it doesn't rub directly against the paint. As many have said, it's pretty tight already so it's by no means necessary.
One more thing: For the sharp edges, just use really fine sandpaper (600# or finer-- I went to 2000#) to very slightly soften/round the sharp edges where it touches the body. I painted mine, so it wasn't a big deal anyway.
Last edited by Spidercat; November 8th, 2012 at 00:17.
This carbon lip really looks phenomenal, I kick myself for not jumping in on this deal. If there is ever a second group buy on this item please let me know. I want one of these.

Looks amazing... Wouldnt last long on our roads though.The Cupra is more forgiving
RS6-03: Milltek, ModTurbos, WagnerIC, Mtm 380, PSS9, Rs6 9,5x21", OZ 10x19", Hotchkis...
RS2-94: Stroker 2,5L, Precision, CatCam, JE, Tial, Nira, H&R, MTM 8,5x18"...
 Posting Permissions

 Reply With Quote