Page 1 of 3 123 LastLast
Results 1 to 18 of 49

Thread: KW V3 Install with photos

  1. #1
    Registered User Aronis's Avatar
    Join Date
    Jan 2004
    Location
    Binghamton Area, NY
    Posts
    3,739

    KW V3 Install with photos

    KW V3 Installation: Front Drivers Side....

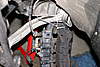
    Two Top Bolts (remove rubber grommets) Drivers side has Brake Line is in the way. 13 mm socket.

    Click image for larger version. 

Name:	RS6strutfrontdri&#1.jpg 
Views:	375 
Size:	66.4 KB 
ID:	11053

    Top Control Arms - Bentley says "never use screw driver or chisel", but mine was so beat up that I know someone used a chisel. And to think they have the right special tools. 16 mm wrench

    Click image for larger version. 

Name:	RS6strutfrontdri&#1.jpg 
Views:	369 
Size:	50.0 KB 
ID:	11055

    Press out (exact right tool would be great, otherwise make due)

    Click image for larger version. 

Name:	RS6strutfrontdri&#1.jpg 
Views:	421 
Size:	40.0 KB 
ID:	11056

    Track Control - clip

    Click image for larger version. 

Name:	RS6strutfrontdri&#1.jpg 
Views:	342 
Size:	54.2 KB 
ID:	11057

    Bottom Control Arm (Audi has special tool, longer than mine, DAM) 18 mm socket, there is a mount plate for the bottom control arm which can be loosened (13mm and 18mm), this gives some more play.

    Disconnect the two mounts for the torsion bar, this makes getting the strut out and back in MUCH easier. Too bad I only figured this out after getting the old strut out, I used a strut compressor to shorten the strut. But letting the Torsion bar down is MUCH easier.

    Click image for larger version. 

Name:	RS6strutfrontdri&#1.jpg 
Views:	366 
Size:	50.8 KB 
ID:	11058

    THE CHECK VALVE IS RIGHT ON THE STRUT. I took a careful look at the fittings and the spot where KW tells you to place the plug IS NOT A CHECK VALVE. Once you unscrew the bottom bolt on the fitting which enters the bottom of the strut, some fluid drains form the strut but not from the rest of the system. I left this tubing in place pending draining the rest of the system once the two fronts are in place. Then you lossen the nut on top and the fitting at the plug spot comes out of the bracket. THEN you can put a wrench on it more easily (20 mm) to disconnect the fitting. I could not be bothered removing all the lines and the central valves, I'll plug as shown by KW.

    New Strut In

    Forgot to photo the old strut and the mount. To get the old strut apart I used an alen wrench and an 18 mm spark plug socket which has a nut on top so you can use a wrench on it and still put the alen wrench down the sock to hold the strut shaft.

    Reassembling the new strut was a bit difference, used a 19 mm deep regular socket and turned it with a vise grip. The inner staft is held with a 9mm sock on an extension which fit down the middle of the 19 mm socket. Torque? Not sure how to do that, just bottommed out the nut.

    Click image for larger version. 

Name:	RS6strutfrontdri&#1.jpg 
Views:	363 
Size:	44.6 KB 
ID:	11059

    Bottom Link In place, I will torque that once the other side is done and I have the torsion bar back in place so I can drive up on a set of ramps. 19 mm socket and wrench

    Click image for larger version. 

Name:	RS6strutfrontdri&#1.jpg 
Views:	344 
Size:	42.7 KB 
ID:	11060

    Click image for larger version. 

Name:	RS6strutfrontdri&#1.jpg 
Views:	315 
Size:	62.5 KB 
ID:	11061

    Torque it up

    Click image for larger version. 

Name:	RS6strutfrontdri&#1.jpg 
Views:	348 
Size:	72.0 KB 
ID:	11062

    Hang caliper, don't want do pull on the brake line

    Click image for larger version. 

Name:	RS6strutfrontdri&#1.jpg 
Views:	330 
Size:	73.4 KB 
ID:	11063

  2. #2
    Registered User Aronis's Avatar
    Join Date
    Jan 2004
    Location
    Binghamton Area, NY
    Posts
    3,739
    One More Photo..

    Click image for larger version. 

Name:	RS6strutfrontdri&#1.jpg 
Views:	320 
Size:	57.9 KB 
ID:	11064

    Yes, I will remove that tubing at some point.

    Mike

  3. #3
    Registered User Aronis's Avatar
    Join Date
    Jan 2004
    Location
    Binghamton Area, NY
    Posts
    3,739
    Assembling the new strut was actually much easier than taking the Audi strut apart. The coil compresses with just body weight, due to that short secondary coil. I must say the KW coil is much smaller than the stock coil. I thought the car would be much stiffer (certainly stiffer to the quick push) but not as stiff as I thought. Oh well, I'll have to wait for the drive.

  4. #4
    Registered User speedtrapped's Avatar
    Join Date
    Sep 2010
    Location
    ATL
    Posts
    1,935
    Nice write up
    Ebony/Black, DBR Stage 3 race kit, -SOLD :( 996TT Proto 650 basically a sardine can with a rocket attached to the back...11' CTS-V, 540/579RWP hehehehe ;)

  5. #5
    Registered User snoopra's Avatar
    Join Date
    Jun 2007
    Location
    US Virgin Islands
    Posts
    1,047
    Nice write up, what strut settings did you settle on using?
    2003 RS 6______________________________________________
    Mugello Blue/Silver Interior/Wood Trim/Warm Weather Package/
    LED Tail lights/RNS-E/DVD Video/OEM S5 19's/Custom Painted Calipers/Full CAT-Less, Nonresonated Milltek/APR DV's/
    H-Sport Sway Bars/5 Bar FPR/ABT Aluminum pedals/MTM TCU Chip

    -------Other Rides
    2007 Cadillac Escalade
    2007 Jeep Compass
    2006 Jeep Commander
    2006 Chevy Colorado Reg Cab
    -------

  6. #6
    Registered User Aronis's Avatar
    Join Date
    Jan 2004
    Location
    Binghamton Area, NY
    Posts
    3,739
    I used the recommended settings via KW.

  7. #7
    Registered User MaxRS6's Avatar
    Join Date
    Mar 2009
    Location
    Here
    Posts
    2,673
    Nice pics and writup- Thanks for the effort and welcome to the KW club!
    210K miles rolled

  8. #8
    Registered User Aronis's Avatar
    Join Date
    Jan 2004
    Location
    Binghamton Area, NY
    Posts
    3,739
    I should have bought these sooner...

    Ordered...

    To remove nut from top of rear strut.

    Click image for larger version. 

Name:	kl-0056-17-72..jpg 
Views:	242 
Size:	14.0 KB 
ID:	11065

    Special tool to press out ball joint.

    Click image for larger version. 

Name:	vw_matra_t40010..jpg 
Views:	228 
Size:	47.7 KB 
ID:	11066

    If there was a special tool for the top two links I would have ordered that too.

  9. #9
    Registered User hahnmgh63's Avatar
    Join Date
    Feb 2007
    Location
    Roy, WA
    Posts
    3,305
    I could have sent you them for the price of shipping. The strut tool is fairly common, usually available at Schuck's, Kragens, Autozone. The ball joint tool from a quality manufacturer, either Snap-on or Germany, Hazet...) is a must.
    2003 White RS6 2013 Midnight Blue S5
    2013 Daytona RS5 2x944 Turbo's 1974 911 w/'91 3.6ltr motor
    Roy, WA

  10. #10
    Registered User Aronis's Avatar
    Join Date
    Jan 2004
    Location
    Binghamton Area, NY
    Posts
    3,739
    When I was fishing for an 18 mm socket with a nut head (aka a spark plug socket), Autozone did not have such an animal. I told them exactly what I was looking for and for what, but no dice. Sears had an 18mm spark plug socket which worked perfectly.

    Yes that ball joint tool will be very helpful. As in the photo I could get one of the smaller tools on ONE of the upper link fittings, but the other required a c-clamp with a small 4mm socket as a pusher LOL. worked great. The prior mechanics have been wedging the space in the stearing arm, a no-no for sure. I'm looking forward to having the right tool for the ball joint. The other side will be much easier as I have learned how! Taking down the mounts for the torsion bar is KEY. Draining the shock first will also save much time as I screwed around with the fitting I was supposted to cap. Thank God I did not open that fitting because the full pressure of the DRC leftover would have sprayed out! Perhaps after I drain the system I will be able to look inside that fitting to figure out if there is a check valve somehow in side there but I doubt it.

    Mike

  11. #11
    Registered User Aronis's Avatar
    Join Date
    Jan 2004
    Location
    Binghamton Area, NY
    Posts
    3,739
    Passenger side 50% done. Just need the T40010.

    One bolt on top is not a straight shot due to a rigid line right about it. A/C tubing I think. I need a 1/4 offset

    Mike

  12. #12
    Registered User Aronis's Avatar
    Join Date
    Jan 2004
    Location
    Binghamton Area, NY
    Posts
    3,739
    Boy that T40010 is just great! I finished the passenger side in a total of about 2 1/2 hours (between two nights).

    I drove it after torquing the lower bolts for the strut. No problems with stearing that I can tell at least at low speed on my bumpy road. No noises, lock to lock turning.

    Front may be too low, I bottomed out coming in my driveway (was going very slow since I suspected that my happen). It may be because the rear is still sitting much higher than the front.

    The front is low enough that I could not drive up on my low profile ramps LOL. I'll see if when the rear is done I will be able to drive on the ramps, otherwise I'll get some 2x10's to put the ramps on so I can drive up onto the 2x10's first and get enough clearance.

    Yes, it is drivable with the rear undone. Yes it is loose and bouncy, just like the day I drove it into the Audi Dealership four years ago when the DRC first failed. I was driving it like that on the highway...not fun... but since I have a rental this week that is an HHR, the bouncing RS6 still handles better than that 1/2 truck 1/2 car thing.

    Mike

  13. #13
    Registered User V8weight's Avatar
    Join Date
    Dec 2008
    Location
    St. Paul, MN
    Posts
    2,249
    Good work Mike! What are your "B" measurements in the front right now? Keep in mind they'll settle around another 1/4" after few weeks.
    Pat - Eisenmann race exhaust, Catless downpipes, KW V3's, H-Sport sways, 034 Control arms, Apikol diff mount, Sterns motor mounts, Forge dv's, Stainless brake lines, Venair hoses, Sportec vent mod, Euro tails, Viper Tuned ecu/tcu, DPE S20's 19x9.5, 275/30/19's

  14. #14
    Registered User Aronis's Avatar
    Join Date
    Jan 2004
    Location
    Binghamton Area, NY
    Posts
    3,739
    I set them to 305 mm in front and 195 mm in the rear. I may have to raise the front, but need to wait until the rear is done. I hope the rear goes quicker than the front. I'm disconnecting the struts at the check valve in the strut, so once I'm done and the car is driveable I'll do the messy deed of emptying the DRC and capping the ends.

    I am going to get the car corner balanced and aligned at some point.

  15. #15
    Registered User Brav's Avatar
    Join Date
    Feb 2009
    Location
    Huntington Beach, CA
    Posts
    1,120
    I started wit those measurements too. I found the rear was too high. Either that or I measured poorly..
    03 RS6 | Daytona Gray on black | KW V3 | Rotiform 19x10 Wheels | REVO ECU | MTM TCU | 170k miles and counting..
    "Some people play hard to get... I play hard to want."

  16. #16
    Registered User LIRS6's Avatar
    Join Date
    Jul 2004
    Location
    Long Island, NY
    Posts
    640
    Nice work. I did the faux-pas screwdriver trick. Did u replace all bolts/self-tightening nuts with new as suggested by Bentley? Didn't appear so, just curious
    GBNF: Mugello, silver, carbon, RNS-E, H&R coilovers, Hotchkiss
    '14 GL550
    '79 911SC Targa

  17. #17
    Registered User Aronis's Avatar
    Join Date
    Jan 2004
    Location
    Binghamton Area, NY
    Posts
    3,739
    Drivers side no. I used all old hardware. Had time to start project but the parts did not arrive soon enough.

    Passenger side new nuts, new strut mount and new spring seat.

    I plan on swapping out the old nuts on the drivers side.

    Rear passenger side done tonight. New strut mount, old bolts. Took me 3 hours.

    Rear looks too high as set. I may have to drop it a 1/8 inch or so.

    Tomorrow I'll get the last one done. Test drive, then tackle removing the DRC tubing and capping the lines.

    I plan on draining it from the rear as the tubing is longer and I think I can capture more of the fluid.

    Mike

  18. #18
    Registered User Aronis's Avatar
    Join Date
    Jan 2004
    Location
    Binghamton Area, NY
    Posts
    3,739
    Done!

    Drives very nicely! Steering is unaffected. I'll watch for uneven wear.

    Need to drop rear height a bit. Need to drain DRC and cap.

Posting Permissions

  • You may not post new threads
  • You may not post replies
  • You may not post attachments
  • You may not edit your posts
  •